Host your application for free with Vercel (step-by-step)
Do you want to learn how to host your next application for free with Vercel? In this post, you will learn step-by-step how to do so, and you will also learn when it is free and when it is not!
In this post, we will cover the following topics:

VPS Hosting Course
Learn everything you need to know about servers and hosting your own applications!- What is Vercel?
- Some questions regarding Vercel
- How to host your application for free with Vercel?
- What’s next?
- Conclusion
What is Vercel?
Vercel is a cloud platform that allows you to host your applications on the web. It works based on your git repositories, and it is compatible with static sites and multiple different frameworks like React or Vue.
One of the aims of Vercel is to ease the development process with its product. For example, they allow you to push changes to your repository and immediately receive a preview URL that you can share with the people you are working together!
Additionally, they are distributed worldwide, which ensures that your users get the fastest access to your application possible.
Some questions regarding Vercel
What can you host with Vercel and what not?
Need help or want to share feedback? Join my discord community!
Vercel allows you to host both dynamic and static sites. In addition, they also have presets for basically every framework that I can think of.
How is the URL of your final site structured?

If this guide is helpful to you and you like what I do, please support me with a coffee!
The URL structure is: http://projectname.vercel.app.
Can you use a custom domain?
Yes, for in-depth instructions, check here.
What state does the repository have to be in?
The repository can be either private or public.
Which requirements apply to using Vercel for free?
The project has to be non-commercial to be used for free.
How to host your application for free with Vercel?
Let’s jump right in and see step-by-step how to host an application with Vercel for free.
- Login with GitHub, GitLab, or Bitbucket (you can also add the other options afterward)
- Create a new project

- Import a git repository of your connected accounts (this time I will host the website that we created with Tailwind CSS in this post here!)
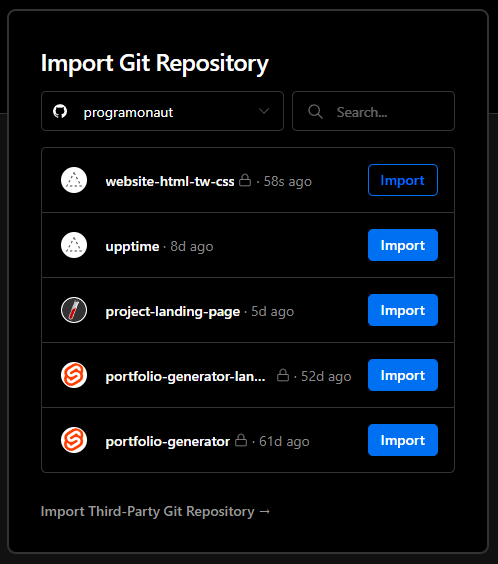
- Check the configuration and update if necessary (I had to set it to vite)
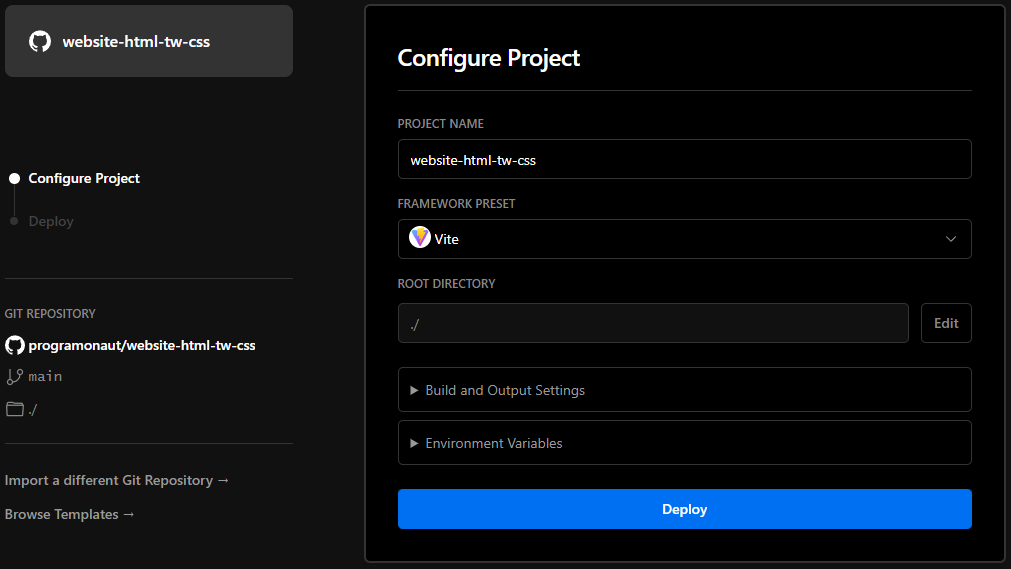
- Click Deploy (after that it will show you a success message and you can visit the created site)
- Later you can find the domain in the project overview
What’s next?
Add a custom domain!
At the moment, your landing page is discoverable under the vercel.com domain. However, in most cases, to give your landing page a more personal touch, you want to give it another domain.
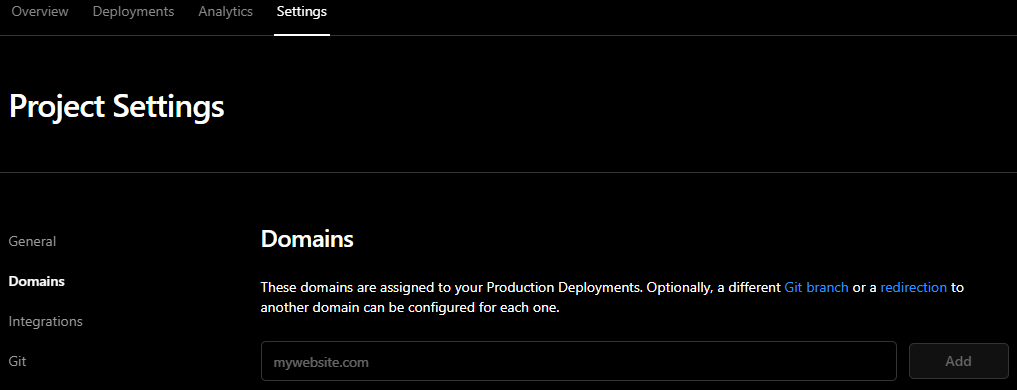
Therefore visit the settings tab of your project and go to the Domains page. Here you enter the new custom domain and then follow the steps described by Vercel.
Conclusion
In this post, we learned how to use Vercel to host applications for free. You can use it to host your next personal (not commercial) project for free!
Did you use Vercel already? Share your experience in the comments below!
In case you got some questions regarding this post or anything else regarding your projects feel free to ask! I would love to help you 🙂
And lastly, if you liked this blog post consider subscribing to my newsletter. In it, I send a monthly update on all the posts I created!
[convertkit form=2303042]
